Archive for News and Press Releases – Page 3

Eric’s Party at the Hyatt Valencia

On Saturday 8/14 we photographed Eric’s 16th birthday party at the Hyatt Valencia.  What a grand party indeed.  He invited 90 of his close friends for an evening of music, food and all around fun.  Thanks Eric for letting us share and photograph your birthday event, and I do mean event.  Here are just a couple of tease photos from the event.  SCV Center for Photography supplied 2 photographers for the evening, and it was more fun than work, as the kids were a blast.

eric party bw_KAC9472-Edit

fisheye overhead_MEL0293-Edit

Shooting Ideas…..

There are times when your photographic creative juices fail you, and you just can not come up with any ideas of what to photograph, but you want to photograph.  Here are a few ideas for you to consider:

  1. Your Yard:  You may think this is funny, but your  yard is a target rich environment.  Most of you are likely to have flowers, roses, herbs or plants.  These items always make great macro subjects.  And don’t forget the grass, which first thing in the morning with dew and sunlight can be pretty pleasing.
  2. Your House:  To be more specific, the kitchen.  Consider those hanging pots, or the many utensils you have laying around.  If you just look around, you may be surprised what you see.
  3. Park:  Most us have a park fairly close to home.  The kids play area always has some interesting objects, that might be interesting macro shots.  The kids playing, laughing and running are great photos to send the grandparents.  You may even be lucky to have a water fountain or other textures to consider.
  4. Industrial Park:  Take a drive though the local business park.  Check out the textures on the building, as they can make for some interesting abstracts.  A lot of businesses have some pretty nice landscaping, so again, flowers, plants and even water treatments can make for great photos.
  5. Farmers Market:  Most towns today have a local farmers market, and this can be an awesome place for photographs.  You should always ask the vendors if they mind having the produce photographed, but generally, most have no problems.

Hopefully these tips can you help you jump start your creative juices on those slow days.  Enjoy, and keep shooting.  If you are interested in other ideas, please log onto our website at  www.scvphotocenter.com and check out our many workshops each month at the SCV Center for Photography.

Sneak Peak of our latest portrait session in the studio….

Final Cassie 13_MEL9061-Edit_pp1_pp ver 2 web

Enjoyed shooting the happy couple after the wedding.

Come on into the SCV Center for Photography for your portraits.   www.scvphotocenter.com

Ansel Adams photos found at Garage Sale

You have read that correctly.  A Fresno man purchased 2 small boxes 10 years ago for $45, negotiated down from $70 and now reports are coming in that they could be worth upwards of $200 million.

According to the story, 65 glass negatives created by Ansel Adams were believed to have been destroyed in a 1937 fire that had destroyed over 5,000 plates.  The plates were created sometime between 1919 and 1935 and included his iconic locations of Yosemite and San Francisco.  It is thought that Ansel had used them to teach a photography class in Pasadena and then stored them in a warehouse and never reclaimed them.  The original boxes were purchased in a warehouse sale back in the early 1940′s prior to being purchased again in a garage sale in 2000.

So if you are out garage sale hunting, you never know what treasures you may come across.

Studio Image wins Best of Show

The image “Beauty from Behind” shot in the studio by Mel Carll of the SCV Center for Photography won BEST OF SHOW last night at the Professional Photographers of LA County (PPLAC).  The image also was Best in Class and received a Merit award as well.

The image was created while preparing for an upcoming Macro Workshop at the studio.

Mel Carll yellow flower_MEL2919

Fall into New England Photo Trip

Fall Into New England – A Photographers Outing
Wed. Oct 6- Sunday Oct 10 Vermont/New Hampshire

Tues Oct 12-Saturday Oct. 16 Maine
Guide: April Bielefeldt

http://www.yourphototravelguide.com/

April Bielefeldt is a nationally-recognized, award winning photographer and current President of Santa Clarita Valley Photographers Association. She has lived in several areas of the country, but New England continues to be her favorite photographic destination. She has led photography sessions in Maine, Vermont, and New Hampshire for the past six years with great success. She has a degree in Fine Art and Design, and has curated both art and photography exhibitions.

Read on – this is an opportunity you shouldn’t miss!

October is not complete without our annual guided photo trip to New England. Autumn in New Hampshire, Vermont and Maine is a feast for the eyes and the senses. The brilliant reds, the early morning frost on the leaves, bright yellow school buses filled with children in bright sweaters, red barns, single lane roads with fallen leaves blown across and the slow morning mist as it drifts through the trees. This is a wonderful sampler of Maine, New Hampshire and Vermont- giving photographers some memorable and saleable images of a Classic New England Autumn.

Each day will begin early to capture the first light and end around 6 pm when we lose the light, followed by a wonderful meal in a local restaurant with foods reflecting the season of fall in New England.

Most of the Photography locations require some walking. Participants can choose when we stop if they want guidance or just be left on their own. Stops include a variety of photographic possibilities including historic buildings, interiors, farm stands, trees, covered bridges, broad landscapes, close up details, people and animals enough to satisfy any photographer. The small group allows for input from photographers and the ability to stop on single lane roads. The pace is structured to allow plenty of time to set up, use different lenses, and see all the details.

As always we are at the mercy of “Mother Nature”. I choose the dates based on what has typically been the best time to capture the color. Of course, the wind goes where it will, so no guarantees. On the other hand, “if you don’t like the weather, just wait five minutes….”

We still attempt to photograph on rainy days, as alternate locations are set up for these occurances. It is important to bring your gear and be ready to photograph! I am a CANON photographer and a variety of Canon Lenses will be available to borrow.

The details? This Year I have split the trip to accommodate those on limited budgets for time and money.

Please contact us soon to join us !! 818-723-7413 April or april@aprilart.com

Find us on Facebook or see our Webpage www.yourphototravelguide.com

Studio Rentals

Just a reminder that the SCV Center for Photography rents our studio space for your studio projects.  We rent in 2 hour blocks.  Our rates start at $120 for the first 2 hours and the per hour rate drops as you add additional hours. This rate also includes 1 of our backgrounds.  If you don’t have lighting, we can handle that as well with our studio lighting packages.  So if you are looking for space to photography that special project, give us a call.

Our space is also available for rent for meetings, classes or corporate training events as well.  We have tables and chairs available for meeting rentals as well.

Fireworks

With the 4th of July just around the corner, here are some quick tips to get the shot:

  • First, you must use a tripod.  Shooting fireworks will require a longer exposure, so a tripod is a necessary requirement.
  • Next, set your aperture to f11, as you want a fair amount of detail due to the distance between you and the fireworks.
  • You should set your camera to manual mode.
  • Start with a shutter speed of about 3 seconds.  Check your display screen after taking a shot.  Adjust your shutter speed based on what you see.  If it is too bright, increase the time to maybe 3.5 seconds.  If you camera has bulb mode, use a remote and then you can adjust the exposure based on your own preference.

Enjoy and have a safe 4th of July weekend.

Review: Mamiya DF Camera and Mamiya DM56 Digital Back

Review by David Saffir, instructor with SCV Center for Photography

Not too long ago I wrote a review of the Mamyia AFDIII and the Leaf 22MP back. At the time, I felt it was an excellent camera, and I still do.

In this report, I’ll cover my recent experience with another Mamiya camera and digital back: the Mamiya DF body, and the Mamiya DM56 digital back. Since space is limited on the blog, I’ll hit the high points as I see them.

Bottom line: a greatly improved, highly flexible camera body that, coupled with this digital back, delivers superb image quality. I have a few nitpicking suggestions, but overall this camera is impressive.

New Mamiya DF Body and Mamiya DM56

Dan Cuny, of Mamiya/Mac Group, came to the SCV Center for Photography in Santa Clarita and provided camera gear for us to use. We started the day with a live demo for a number of photographers from the local area, shooting still life.

The camera feels robust and well made. The viewfinder is big and bright, and the in-viewfinder indicators are easily read. We used two lenses: the 80mm f/2.8 lens supplied with the camera, and a manual-focus 120mm macro lens. The camera is very well balanced with either lens mounted. I’ve found that I can work all day without suffering undue fatigue.

The camera can be used with focal-plane, or leaf shutter lenses. Highest sync speeds are reported up to 1/1600. The DF camera body is compatible with existing 645AFD lenses.

The camera was equipped with a Mamiya DM56 digital back. This back provides excellent resolution, 12 stops of dynamic range, and true 16-bit capture. Color rendered by this back is terrific – vibrant, very accurate, and totally clean.

The large, bright screen on the back makes it easy to view images and manage the controls – although performance in direct sunlight could still be improved.

Autofocus feels appreciably faster than previous camera bodies, and reports from others who have tried this camera confirm this.

We set up a Calumet shooting table, and several monolights. We started out with high-key lighting, but switched later on to a more dramatic approach. The shooting table is ideal for this work, providing a smooth, clean translucent plexi surface that allows totally flexible light placement.

Setting Up At The SCV Center for Photography

We shot with the camera tethered to a Mac Book Pro, using the provided 14-foot long Firewire 800 cable. Leaf Capture 11.3 was used to manage capture and image processing.

The Indian bowl we photographed (a personal possession of mine) was initially shot using high-key lighting, with the camera mounted on a tripod. We used a Sekonic hand-held meter to measure exposure, and a PocketWizard Plus to trigger lighting from the camera.

Note the clean contrast lines in the bowl:

High Key

And here’s a version with more directional lighting:

Note lack of shadow noise

Note how clean the shadows are; virtually no luminance or color noise. We were using ISO 100, one step (albeit a relatively small one) above base ISO of 80.

I was quite surprised by this; conventional wisdom concerning high pixel density is that shadow noise will be significant – but not in this case. I used virtually no noise reduction in the images shown in this article – although I can’t say for sure that there isn’t some processing going on in the guts of the digital back. Regardless, performance exceeded expectations.

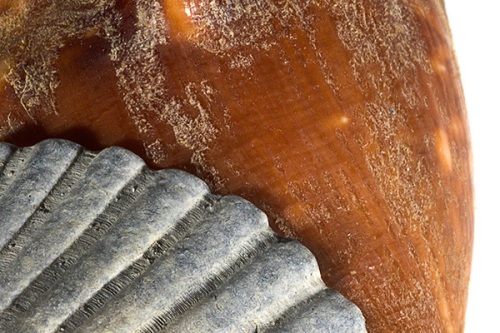
We also shot a still life of some sea shells. Note the rendering of subtle colors, and in the second image, the sharpness and detail. Impressive.

Shot W/ Macro Lens
Shell Detail

Later in the testing, I had the opportunity to photograph a model in a studio setting. I often use low-key, dramatic lighting in my personal work. The lighting setup was created by a friend, Ron Brewer – I tweaked it a bit, and this is the result:

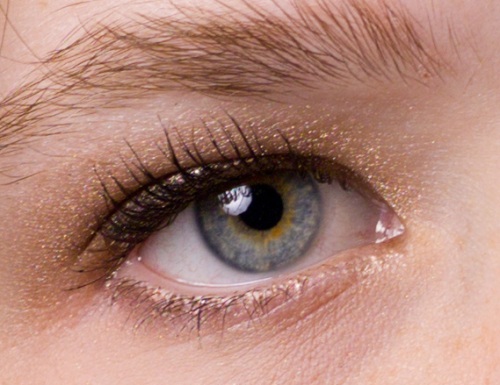
The highlight/shadow transitions are clean, and free of noise. Also note the high level of detail around the eye (below). These images are not retouched, other than a basic levels/curves adjustment.

Crop from full portrait

The nitpicks? The thing that bugs me the most is the location of the Auto exposure lock button – it is placed toward the outer side of the camera grip – and I found myself having to adjust my hold on the camera to reach it.

The digital back viewscreen, like just about every one out there, is very difficult to see in bright light outdoors, much less direct sun. It is, however, great in other circumstances. Don’t know if this is a solvable problem; at least Hasselblad provides an LCD view of the histogram on top of the camera grip.

And last, battery life, as with all MF digital cameras I’ve used, is less than I’d like. I realize the battery has to power the guts of the back, and the preview screen, but I’m still blasting through several batteries a day outdoors. If Nikon and Canon can make batteries that go a full day, why can’t the MF manufacturers?

Last but not least:

Say what you will about performance of high-end DSLRs, there’s still a noticeable difference between 14-bit capture and medium format 16-bit capture, in color fidelity and accuracy – and as good as DSLR lenses are now, it’s still true that MF lenses are hard to beat.

The flexibility of the camera is very good – given the sync speed, choice of shutters/lenses, software (Phase One or Leaf), and ergonomics. Whether you shoot weddings, studio, fashion, or landscapes, it’s worth a look. I haven’t shown them in this article, but the images I took on location are just as good as those provided here. (by the way, outside temps were over 100F one day!)

And a parting thought: this latest Mamiya incarnation has a new feeling of sophistication and polish that comes through
every time I pick it up. It’s a shooter’s camera.

——————————————————

Disclosure: I did not receive any compensation from Mamiya or Mac group in exchange for writing this article.

Mamiya Review coming soon…..

Last week we had the Mamiya DM 56 digital back in the studio for demo.  Below is a initial post from instructor and photographer David Saffir from that demo.  Within the next week or so, David will post a full on review of the Mamiya package.  For additional information on David Saffir, please head to his blog http://davidsaffir.wordpress.com/

I just received a demo unit of the latest Mamiya medium format camera body and the DM 56 digital back. I’ve already completed one studio shoot, and I plan to be shooting with the camera for the next several days. Look for a review of the camera and Leaf software early next week.

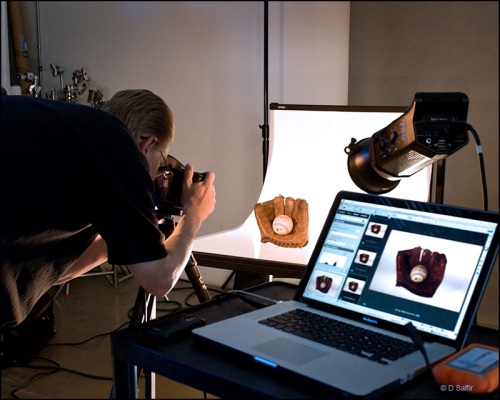
This is a shot of Mel Carll, of SCV Center for Photography, working with the Mamiya in-studio. We’re using a Calumet product table, and a number of studio strobe units. The camera is tethered via Firewire to a Mac Book Pro, running the latest version of Leaf Capture. Note the large on-screen preview, histogram, and other tools. A number of photographers came to the studio for the camera and software hands-on demo, conducted by Dan Cuny of Mamiya/MAC group. More on this setup soon!

Mel Carll shooting in-studio