Archive for Photo Tips – Page 4

Tip of the Week: Networking

As photographers, we focus on the photography side, but sometimes forget the other side of developing new relationships.  Here are a few ideas:

  1. Develope your own Network such as Twitter or Facebook.
  2. Be active in whatever networks you are involved in.
  3. Get a mentor, as you will learn from their experience.
  4. Follow up with the people you meet.

These are just a few ideas to start building your network.  For more ideas, and a indepth discussion of social networking, join us for our “Mastering Social Networking” workshop with David Saffir on March 10th for part 1 and March 17th for part 2.  Cost is $109 for both sessions.
New Workshop Series added “Child Photography Master Class”

Join well-known child photographer Autumn Hull as we present the Child Photography Master Class.  This is a five-day workshop covering absolutely everything you need to know about the business of child photography, including the business plan, marketing, branding, studio lighting, practice sessions, digital workflow, basic and advanced retouching and designing with Photoshop.

The best part is that you can customize this workshop to learn just what you want.  You can sign up for each day individually and only pay for the days you attend.  We keep the class size small, so you will always get all of your questions answered, and you won’t get lost in the crowd.  This series will be held at SCV Center for Photography.

For more information and registration, go to: http://www.scvphotocenter.com/about/child-photography-master-classes

New workshop Series “The Shoot” just added…

Join local Southern California photographers Joey Carman and William Innes from the WIJC-Series workshop series as they explore everything about “The Shoot”.  This mini-series will be held at the SCV Center for Photography in Santa Clarita.

The four evening series will cover everything William and Joey do to prepare, shoot and produce their images. Each three hour session will be jammed packed with tips, ideas as well as an insightful fast track guide in how to take your photography and business to the next level.  Sign up for ALL 4 sessions for $250 for a savings of $26.

For more info go to: http://www.scvphotocenter.com/about/the-shoot-workshop-series

Tip of the Week: Macro Mode

Remember as a kid discovering the whole new world beneath your feet while playing on the grass?  When you got very close to the ground, you could see an entire community of creatures that you never knew existed.

Well, you don’t always need a fancy DSLR to get great Macro shots.  These days, you might not want to lie on your belly in the backyard,  but if you activate the close up mode on your point and shoot or basic DSLR digital camera and begin to explore your world in finer detail, you’ll be rewarded with fresh new images unlike anything you’ve ever shot before.

Even the simplest object takes on new fascination in Macro Mode.  And the best part is that it’s so easy to do with digital cameras.

If you want to learn more about Macro and Cloe up photography, join Ron Brewer on Saturday, February 27th from 9am to 4pm as he teaches everything Macro and Close-up.

Tip of the Week: Convert to sRGB

It is a good idea to shoot and edit in the widest colorspace available.  Typically, this is Adobe RGB 1998.  If you set your camera to this color space, shoot in RAW, and have this as your default colorspace in Photoshop or Elements, it will give you the most possible color information in each shot.  However, when it comes time to output to print or web, Adobe RGB 1998 is too wide… your images will look flat and lifeless.  Or worse, the colors could shift. So…

For print:  When you are done editing your image, go to the Edit menu and select “Convert to Profile…” then select sRGB from the Destination Space popup.  Your prints will look much better.  Save this image as a copy (flatten it first) and append “_sRGB” to the filename so you remember what it is. 

For web/email:  In Photoshop CS4, when you select “Save for Web and Devices,” there is now a “Convert to sRGB” checkbox.  Make sure this is checked!

For more Photoshop tips and learning, join David Green for Photoshop 201 starting on Thursday, February 11th  from 7 to 10pm.

Tip of the Week: Depth of Field

When photographing a subject that is somewhat close, a lot of times the subject can appear flat or boring, especially if you have zoomed in to fill the frame.

To add interest to the photography, include an object  in the foreground to enhance the sense of depth.  This leads the viewer’s eye around and through the scene, from the foreground to the subject in the distance.

For more Basic Camera information, attend our Basic DSLR Camera workshop on Saturday, February 6, 2010.

Tip of the Week: Digital Cameras and Cold Weather…

As winter is truly upon us, one must remember that when we  bring a digital camera from cold weather into a warm house, car or hotel this can cause problems.  When you bring a cold camera indoors, there is the possibility of condensation forming.  One way to help that, is to wrap your camera gear in a towel, and let the equipment come up to room temperature.  The towel will absorb the moisture, and thus assisting in the reduction of possible condensation.  There are several different ways or schools of thought regarding how to prevent condensation, but find the method that works best for you and your situation.

Using a Two-Light Setup for Studio Portrait Photography

Today we are pleased to post a guest blog entry by instructor David Saffir on Two-Light Portrait Photography.

Studio lighting can be quite simple, or complex. Beginner or seasoned pro, lighting can be a matter of personal style, equipment on hand, time constraints, or other factors.

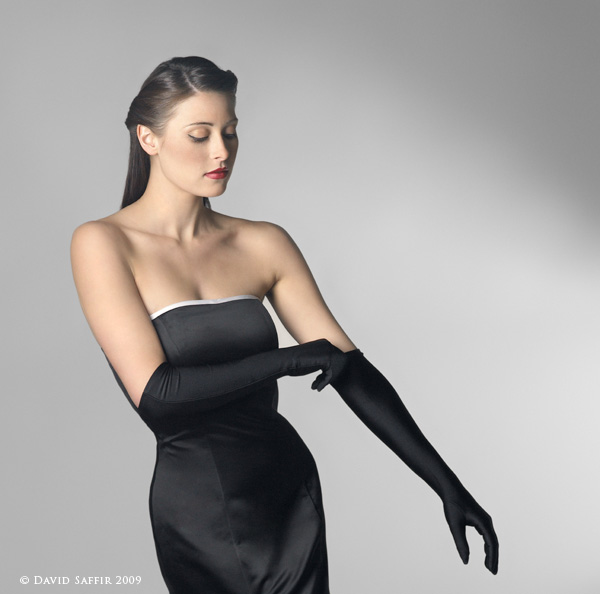
I recently photographed Sarah Muldorfer, a model from our area at the SCV Center for Photography. We had started out with a multi-light, high-key setup. Once that was completed, I wanted to switch to a simpler look that emphasized her elegant dress, long hair, and long limbs. Her position on the set is about 6-8 feet in front of the backdrop.

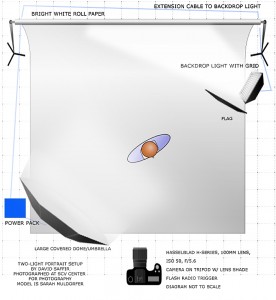
Look at the lighting diagram. There is one primary light, a large umbrella/soft box located camera left, with its center approximately the same level, or a bit higher, than the lens axis. The umbrella is covered with a diffuser.


diagram muldorfer gown saffir finalr3 copy (2) 


The second light is also a strobe, set up with small reflector and a barn door. It was used to create a “spotlight” effect on the white background.  The light is aimed nearly parallel to the background, and was set to low intensity relative to the main light to create the  effect.

Normally I place a flag – such as a piece of foamcore – between a light and the camera to keep the image clean. Also, shooting an image like this with limited lighting pretty much requires that you eliminate ambient lighting – any source can cause issues – including an open door or window, other studio lights, etc.

I often mount the camera on a Gitzo tripod w/ ball head during a shoot. This is a rock-solid setup that works well during shoots where camera position changes fairly frequently. However, Sarah was experimenting with some different poses, and I took the shot hand held, almost as a candid. Exposure was f/8 @ 1/100, ISO 50, 100mm lens (medium format). If that shutter speed seems slow to you, remember that the strobes are firing at a speed of at least 1/1000!

Exposure is very important in this type of shot. If overexposed, detail in the model’s fair skin would be lost. If underexposed, the shadow/highlight transitions, particularly on her skin, would at best be noisy and at worst show a mix of color aliasing and artifacts.  I used a hand-held meter to measure exposure. (note: always point the meter into the lens of the camera, not the light. Meter position is usually just under the chin of the subject.)  Underexposure would also reduce, or eliminate details in her black dress.

Last, her pose turns most of her body toward the light. The umbrella-diffuser combination gives a wonderfully soft light, which still brings up the details. Her nose does not “break the line” of her cheek, and since she was moving when the shot was taken she looks relaxed and natural.  I think this was the shot of the day, and she was very please with it.

 s9232saffirmelblog 


For more on Two Light Portrait Lighting, join us on Thursday, January 21st for our Classic Two Light Portrait workshop from 6:30pm to 9:30pm.  Call for enrollment information as class size is limited.

Tip of the Week: Lightroom Sorting

Did you know you can sort your photos in Lightroom by Edit Time?  In the Library Module there is a very useful sort option called Edit Time.  Sorting the grid view by Edit Time will display the thumbnails with the most recent ones at the top of the grid.

This is an easy way to select all of the photos that have had any form of editing applied.  Note that adding keywords counts as editing.

For more information, sign-up for our Lightroom workshop on January 19, 2010 from 6:30pm to 9:30pm.

Tip of the Week:Did you know…..

You hear a lot about the power of Adobe Camera RAW (ACR), but did you know you don’t have to shoot RAW to you use it? You can also open JPEG and TIFF files. Simply open Adobe Bridge, select the image you want to open in Adobe Camera RAW, then select “Open in Camera RAW…” from the file menu. (You can also press Ctrl-R in Windows or Cmd-R on a Mac.) You get all the non-destructive editing power of ACR, on your non-RAW images!

For more Photoshop ideas, sign up for our Photoshop 101 workshop series with David Green starting on Wednesday, February 13, 2010.