Archive for Weekly Tips – Page 3

Review: Mamiya DF Camera and Mamiya DM56 Digital Back

Review by David Saffir, instructor with SCV Center for Photography

Not too long ago I wrote a review of the Mamyia AFDIII and the Leaf 22MP back. At the time, I felt it was an excellent camera, and I still do.

In this report, I’ll cover my recent experience with another Mamiya camera and digital back: the Mamiya DF body, and the Mamiya DM56 digital back. Since space is limited on the blog, I’ll hit the high points as I see them.

Bottom line: a greatly improved, highly flexible camera body that, coupled with this digital back, delivers superb image quality. I have a few nitpicking suggestions, but overall this camera is impressive.

New Mamiya DF Body and Mamiya DM56

Dan Cuny, of Mamiya/Mac Group, came to the SCV Center for Photography in Santa Clarita and provided camera gear for us to use. We started the day with a live demo for a number of photographers from the local area, shooting still life.

The camera feels robust and well made. The viewfinder is big and bright, and the in-viewfinder indicators are easily read. We used two lenses: the 80mm f/2.8 lens supplied with the camera, and a manual-focus 120mm macro lens. The camera is very well balanced with either lens mounted. I’ve found that I can work all day without suffering undue fatigue.

The camera can be used with focal-plane, or leaf shutter lenses. Highest sync speeds are reported up to 1/1600. The DF camera body is compatible with existing 645AFD lenses.

The camera was equipped with a Mamiya DM56 digital back. This back provides excellent resolution, 12 stops of dynamic range, and true 16-bit capture. Color rendered by this back is terrific – vibrant, very accurate, and totally clean.

The large, bright screen on the back makes it easy to view images and manage the controls – although performance in direct sunlight could still be improved.

Autofocus feels appreciably faster than previous camera bodies, and reports from others who have tried this camera confirm this.

We set up a Calumet shooting table, and several monolights. We started out with high-key lighting, but switched later on to a more dramatic approach. The shooting table is ideal for this work, providing a smooth, clean translucent plexi surface that allows totally flexible light placement.

Setting Up At The SCV Center for Photography

We shot with the camera tethered to a Mac Book Pro, using the provided 14-foot long Firewire 800 cable. Leaf Capture 11.3 was used to manage capture and image processing.

The Indian bowl we photographed (a personal possession of mine) was initially shot using high-key lighting, with the camera mounted on a tripod. We used a Sekonic hand-held meter to measure exposure, and a PocketWizard Plus to trigger lighting from the camera.

Note the clean contrast lines in the bowl:

High Key

And here’s a version with more directional lighting:

Note lack of shadow noise

Note how clean the shadows are; virtually no luminance or color noise. We were using ISO 100, one step (albeit a relatively small one) above base ISO of 80.

I was quite surprised by this; conventional wisdom concerning high pixel density is that shadow noise will be significant – but not in this case. I used virtually no noise reduction in the images shown in this article – although I can’t say for sure that there isn’t some processing going on in the guts of the digital back. Regardless, performance exceeded expectations.

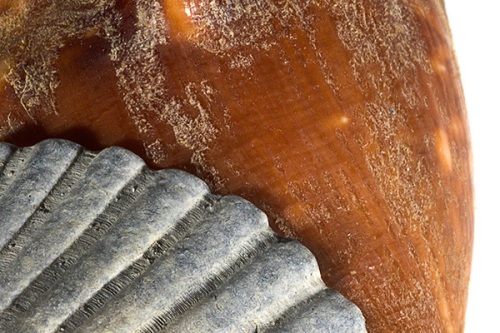
We also shot a still life of some sea shells. Note the rendering of subtle colors, and in the second image, the sharpness and detail. Impressive.

Shot W/ Macro Lens
Shell Detail

Later in the testing, I had the opportunity to photograph a model in a studio setting. I often use low-key, dramatic lighting in my personal work. The lighting setup was created by a friend, Ron Brewer – I tweaked it a bit, and this is the result:

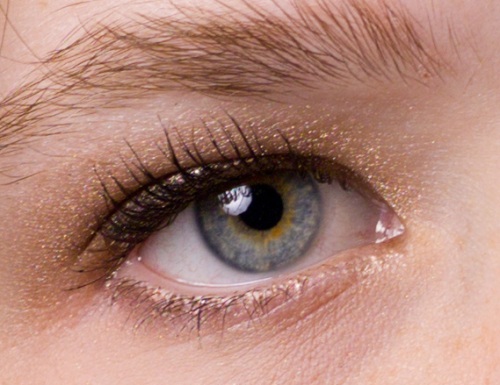
The highlight/shadow transitions are clean, and free of noise. Also note the high level of detail around the eye (below). These images are not retouched, other than a basic levels/curves adjustment.

Crop from full portrait

The nitpicks? The thing that bugs me the most is the location of the Auto exposure lock button – it is placed toward the outer side of the camera grip – and I found myself having to adjust my hold on the camera to reach it.

The digital back viewscreen, like just about every one out there, is very difficult to see in bright light outdoors, much less direct sun. It is, however, great in other circumstances. Don’t know if this is a solvable problem; at least Hasselblad provides an LCD view of the histogram on top of the camera grip.

And last, battery life, as with all MF digital cameras I’ve used, is less than I’d like. I realize the battery has to power the guts of the back, and the preview screen, but I’m still blasting through several batteries a day outdoors. If Nikon and Canon can make batteries that go a full day, why can’t the MF manufacturers?

Last but not least:

Say what you will about performance of high-end DSLRs, there’s still a noticeable difference between 14-bit capture and medium format 16-bit capture, in color fidelity and accuracy – and as good as DSLR lenses are now, it’s still true that MF lenses are hard to beat.

The flexibility of the camera is very good – given the sync speed, choice of shutters/lenses, software (Phase One or Leaf), and ergonomics. Whether you shoot weddings, studio, fashion, or landscapes, it’s worth a look. I haven’t shown them in this article, but the images I took on location are just as good as those provided here. (by the way, outside temps were over 100F one day!)

And a parting thought: this latest Mamiya incarnation has a new feeling of sophistication and polish that comes through
every time I pick it up. It’s a shooter’s camera.

——————————————————

Disclosure: I did not receive any compensation from Mamiya or Mac group in exchange for writing this article.

Mamiya Review coming soon…..

Last week we had the Mamiya DM 56 digital back in the studio for demo.  Below is a initial post from instructor and photographer David Saffir from that demo.  Within the next week or so, David will post a full on review of the Mamiya package.  For additional information on David Saffir, please head to his blog http://davidsaffir.wordpress.com/

I just received a demo unit of the latest Mamiya medium format camera body and the DM 56 digital back. I’ve already completed one studio shoot, and I plan to be shooting with the camera for the next several days. Look for a review of the camera and Leaf software early next week.

This is a shot of Mel Carll, of SCV Center for Photography, working with the Mamiya in-studio. We’re using a Calumet product table, and a number of studio strobe units. The camera is tethered via Firewire to a Mac Book Pro, running the latest version of Leaf Capture. Note the large on-screen preview, histogram, and other tools. A number of photographers came to the studio for the camera and software hands-on demo, conducted by Dan Cuny of Mamiya/MAC group. More on this setup soon!

Mel Carll shooting in-studio


Studio Office available for Rent

We currently have 1 of our studio offices available for rent.  If interested, please call Mel here at the studio for additional details…… (661) 904-2092

Includes:  Private Office, internet access, tons of parking, utilities, and photo studio access time included.

Tip of the Week – New Lightroom 3 Beta 2 additions

Adobe has released the update to Lightroom 3 and are calling it Public Beta 2.  They have added some new features that are sure to bring those who have been on the fence trying to decide is it Lightroom 3 or Aperture.  Here are some of the new features in Lightroom 3 Public Beta 2 that are of interest:

  • Library Module now runs a ton faster.
  • Library Module supports the import of video shot on the DSLR.
  • It also displays the length of the video.
  • They have added an icon that launches the video on your computer.
  • They have added “TETHERED SHOOTING”.  This is the biggest add-on in my view.  And according to reports, it is lightning fast.
  • Watermarking has been added.
  • In the Develop Module, they offer better noise reduction.
  • Added a quick key (X) for quick aspect ratio cropping.
  • The Slideshow Module now has improved previews in advance.
  • You can also add watermarking of your images in the slideshow module.
  • In the Print Module, they have added the “rotate to fit” and also 720ppi option.

As you can see, Adobe has spent some time adding features from the comments of Beta 1 and have improved the program even more.  Once the program is fully release, look for SCV Center for Photography to offer our Lightroom 3 workshop to help you get up to speed on all the new features.

Daylight Savings Time – Let’s Spring Ahead


March 14 is when Daylight Saving time begins – clocks will be set one hour ahead.
  • Replace and test smoke detector batteries.
  • Check fire extinguisher gauges and expiration dates.
  • Check/replace batteries in flashlights and portable radios. 
  • Clean your camera sensor.
  • Empty your camera bag of all that dirt, dust and crumbs from past trips.
  • Sign-up for that workshop at SCV Center for Photography you have been thinking about.


Black & White Conversion from SCVPA meeting

Attached is the slide presentation from the Black & White conversion presented by our own David Green Tuesday evening at the SCV Photographers Association meeting.  This presentation shows a few different ways to convert an image to Black and White, and why some methods are better than others.

Click here to view the David Green B&W Demo file.

Tip of the Week: Networking

As photographers, we focus on the photography side, but sometimes forget the other side of developing new relationships.  Here are a few ideas:

  1. Develope your own Network such as Twitter or Facebook.
  2. Be active in whatever networks you are involved in.
  3. Get a mentor, as you will learn from their experience.
  4. Follow up with the people you meet.

These are just a few ideas to start building your network.  For more ideas, and a indepth discussion of social networking, join us for our “Mastering Social Networking” workshop with David Saffir on March 10th for part 1 and March 17th for part 2.  Cost is $109 for both sessions.

Tip of the Week: Macro Mode

Remember as a kid discovering the whole new world beneath your feet while playing on the grass?  When you got very close to the ground, you could see an entire community of creatures that you never knew existed.

Well, you don’t always need a fancy DSLR to get great Macro shots.  These days, you might not want to lie on your belly in the backyard,  but if you activate the close up mode on your point and shoot or basic DSLR digital camera and begin to explore your world in finer detail, you’ll be rewarded with fresh new images unlike anything you’ve ever shot before.

Even the simplest object takes on new fascination in Macro Mode.  And the best part is that it’s so easy to do with digital cameras.

If you want to learn more about Macro and Cloe up photography, join Ron Brewer on Saturday, February 27th from 9am to 4pm as he teaches everything Macro and Close-up.

Tip of the Week: Convert to sRGB

It is a good idea to shoot and edit in the widest colorspace available.  Typically, this is Adobe RGB 1998.  If you set your camera to this color space, shoot in RAW, and have this as your default colorspace in Photoshop or Elements, it will give you the most possible color information in each shot.  However, when it comes time to output to print or web, Adobe RGB 1998 is too wide… your images will look flat and lifeless.  Or worse, the colors could shift. So…

For print:  When you are done editing your image, go to the Edit menu and select “Convert to Profile…” then select sRGB from the Destination Space popup.  Your prints will look much better.  Save this image as a copy (flatten it first) and append “_sRGB” to the filename so you remember what it is. 

For web/email:  In Photoshop CS4, when you select “Save for Web and Devices,” there is now a “Convert to sRGB” checkbox.  Make sure this is checked!

For more Photoshop tips and learning, join David Green for Photoshop 201 starting on Thursday, February 11th  from 7 to 10pm.

Tip of the Week: Depth of Field

When photographing a subject that is somewhat close, a lot of times the subject can appear flat or boring, especially if you have zoomed in to fill the frame.

To add interest to the photography, include an object  in the foreground to enhance the sense of depth.  This leads the viewer’s eye around and through the scene, from the foreground to the subject in the distance.

For more Basic Camera information, attend our Basic DSLR Camera workshop on Saturday, February 6, 2010.